Wednesday, December 14, 2016

Adventures in Bangkok


Just returned from a week in Bangkok, Thailand!  Although I was there for work, I found time to be a tourist on the evenings and weekend.  

I have heard Bangkok described as "Southeast Asia for Beginners," a description with which I wholeheartedly agree.  As a large city (9 million) in a relatively industrialized nation, Bangkok has all the Western creature comforts + fabulous infrastructure. But it still has a bit of Southeast Asia sensory overload!


Silk & Fabric Shopping

Jim Thompson House

Spirit House at Jim Thompson.  Spirit Houses are a part of animist culture. 

The Jim Thompson House Museum is one of the most popular tourist attractions in Bangkok.  Jim Thompson is widely credited for reviving the Thai silk industry in the mid 20th century. His home, which is now a museum, was designed to his specifications as a hybrid of the traditional Thai wood house + some Western comforts like an indoor staircase.  In traditional Thai homes, the staircase is on the exterior.

The museum is accessible by guided tour only and largely focuses on the enigmatic man himself, with a little bit of detail on the silk making process.


What I learned about silk-making:  Thai silk is made with yellow cocoons which creates an uneven slob with gold hues.  The process of unwinding the silk cocoons to make filament is laborious.  The filament of the cocoon is too fine for commercial use, so 3-10 filaments must be separately unwound before being reeled together to produce the desired diameter.  The unwinding process takes place over a pot of boiling water.  The water softens the sticky gum on the silk, making it easier to unwind.

Many tailor shops/gift shops sell silk yardage.  I purchased printed silk at Cotton House and the Jim Thompson outlet, as well as a Thai cotton from a silver shop on Chareon Krung Road.

The Jim Thompson Outlet is the only JT store that sells fabric yardage in addition to housewares and accessories.  There are 4 floors and it is worth the trip a bit out of the main tourist area.


Housewares at the JT Outlet; Prices were slightly better than the JT retail shops
I had the pleasure of meeting up with Meg of Cookin' and Craftin' for fabric shopping and a lovely dinner.  We met at Hieng Yoo Huat which is located right next to the Asoke BTS stop.  Though small, the selection was very good and I would have purchased if I didn't already have "stash guilt."  Meg also took me to a tiny button shop around the corner where I purchased machine needles for a fraction of the price in the US.

Tailoring

In 2012, I had two dresses expertly made at Cotton House. This trip I wanted to try a new tailor to copy a much loved dress purchased in the south of France several years ago.  On the hotel's recommendation, I made an appointment at Peninsula Tailors but left the store within a few minutes after they quoted me TBH 8000 (approximately USD $235) to make the dress with the Anna Sui fabric I had in tow.

I headed back to Cotton House to get a competing quote.  The owner, Mrs. Reed, offered me coffee and kao tom mud and agreed to do the job for TBH 3000 (approximately USD $80).  Completed in 36 hours, the dress is a perfect copy.

Cotton House: Inside the Retail Shop

The workshop is around the corner from the retail shop and also houses overflow fabric

The copy dress in Anna Sui on the left; Original dress on the right

While I am no expert on custom clothes, I have learned a few things from my experience with Cotton House and Hoa Fashion (in Hanoi and blogged here) as well as the stories I have heard from colleagues in the region:

  • Most tailors primarily work in men's suiting.  If you want to have women's clothes made, ask in advance.  
  • Always look to see if the tailor has their own workers located close to the retail shop.  Most tailor shops send out all the work to a "sweat shop" in a lower rent area and any alterations, no matter how minor, will take a half day or more.  Both Cotton House and Hoa had their own staff on site and made alterations quickly as a result.
  • I had very little success in bargaining at Cotton House and Hoa.  Although no prices are listed, both tailor houses did actual calculations before providing a quote.
  • If you want to bring your own fabric, ask the tailor in advance.  While Hoa and Cotton House were willing to work with my fabric, many other stores will not.  In particular, the tailor houses for menswear.  
Food
The best street food I had this trip was Burmese.  Burmese food has strong Indian influences.  It tastes and feels very different from Thai/Vietnamese food.

On the panga headed to Mona's
                           

Mona's is located in the Phra khanong market close to the clothing section.  It's your typical street food joint with plastic chairs, folding tables, and no menu.  Finding this place was sheer luck and involved no less than 10 people, a high speed panga down the canals, taxi, a translation app,  a random guy on a motor scooter that scouted the market for us without finding Mona's, and a hefty bit of profiling when I saw a woman wearing a headscarf and correctly assumed that we were close to the Burmese section of the market. (Although Myanmar is predominantly Buddhist, I believe the Burmese in the Phra Khanong market are Rohingya muslims.)  Mona served mohinga, a traditional breakfast fish soup,  and my favorite khao swe thoak, rice noodles with peanuts, tomato sauce.  Here is a great video and interview with Mona.

Directions to Mona's :  Take the BTS sky train to Phra Khanong.  Exit the station and make a right on Sukhumvit Soi 71.  Continue until you see this street sign on the right side of the street.

Make a right at this street sign off of Sukhumvit Soi 71

There is a gold jewelry store on the corner.  Continue down the street and into the market.  Ask for Mona's restaurant (Mona? Myanmar?)  It's very close to this market entrance.

This is the gold jewelry store next to the street sign for the turn to Mona's

Night Market!

Monday, November 21, 2016

Cozy for the Holidays!


It's a shame I didn't sew this up last year when I purchased the Italian wool knit from Emma One Sock with McCalls 6844 in mind.  Better late than never...and just in time for the very late arrival of cool weather in the northeast.  I think this may quickly become my most worn garment of 2016!


Based on Pattern Review, I cut a size smaller (XS) and graded up to a small in the hips.  Reviewers also noted that the sleeves were tight so I graded those to a small as well.  Even though I abandoned the sleeves in favor of a vest.

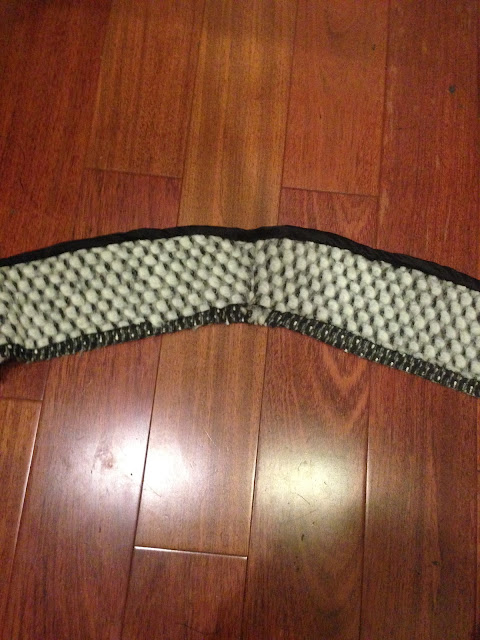
The vest is as beautiful on the inside as the outside.


I used this tutorial for the continuous bias tape and this tutorial for a hong kong seam.  I catch stitched all seam allowances down. Quite laborious but worth it.

After finishing all the seams with the bias tape I was inspired to incorporate the black silk charmeuse into the collar as well.  I love the result.


It was tricky to reduce bulk when sewing the collar because the wool was so lofty. I graded the seams a good deal.


****
It was a busy fall with visits from family + weekends away in Atlanta, Philadelphia and California.   California was extra special because it was a girls weekend to wine country. Highly recommend Hanzell Winery in Sonoma for its picturesque and secluded location in the Mayacama mountains, chateau inspired by Clos Vougeuot in Burgundy, and informative tour of the production facilities and cave.  The tour + tasting is by appointment only which is nice because you don't have to deal with the crowds at the commercialized wineries along the wine trail.  We dined at Frances in San Francisco, Girl and the Fig in Sonoma and Michael Chiarrello's Bottega in Yountville.  Girl & The Fig was easily my favorite. Can't beat California produce + French cuisine....  


I am traveling to Bangkok, Thailand on Friday on business, but have extended my stay for a short weekend to sight-see.  Top of the list when I escape the conference room is a visit to the Jim Thompson House silk museum + custom clothes.  On my last trip to Bangkok, I had dresses made at Cotton House but would like to try a new tailor this time. On the off chance anyone reading this has had clothes made in Bangkok, any tailor recommendations? 

Monday, October 24, 2016

Lessons in Prewashing...


I had high hopes for this beautiful navy knit from Paron's Going out of Business Sale in NYC's garment district.  The Italian viscose has a lovely hand with about 20% stretch.  It's wrinkle free = perfect for travel.

From the start, I intended to use the fabric for an office appropriate dress with out of print Vogue 8663.


 But the finished dress was solidly in the boring camp (even for office wear), too big and doesn't at all do justice to the lovely fabric.


Accessorizing with a silk scarf belt makes the ensemble a tad less forgettable, don't you think?  But still quite blah....


Although I am usually a Vogue size 10, I cut out a 12 based on the finished measurements.  It turned out to be too big in the bodice.

I turned to Pattern Review for assistance with the pleats.  After marking with chalk I basted them in place by hand.  I also topstitched the pleats down (not in the pattern direction).  In spite of my prep, the center pleat shifted.  I unpicked it and re-sewed it as a dart.  Better but far from perfect. 


I applied Sewkeyse knit stay tape to the neckline, sleeves and hem and then folded over twice and catch stitched.  I prefer the look of hand finishing to machine or even twin needle.

I wore the dress twice before sending it out with the laundry. (One of the many peculiarities of NYC living is that many of us don't have in-unit washer/dryers...) I forgot to specify that the dress needed to be air dried and it shrunk...A LOT.  The new "dress" is tunic length and barely covers my bum. On the upside, it fits pretty close to perfect in the bodice...


To keep the faith, I am reframing this experience as a wearable muslin and intend to make the dress again with the following modifications:
  •  smaller size (8 or 10)
  •  lengthen the bodice 2 inches
  •  use darts instead of pleats in the bodice
  • cut the back bodice and back skirt on the fold
  • construct a full lining
Guess who will never again forget to prewash her fabric?

Tuesday, September 6, 2016

Cocktail Culottes


Semi-formal, Black Tie Preferred, Coastal Cocktail, Dressy Casual...

Between the destination wedding craze and the Pinterest inspired mason-jar/burlap trend, wedding attire has become C A S U A L.

In July I attended a (husband's) family wedding in Lancaster Pennsylvania.  The couple didn't specify dress code and I am not close enough to have a sense of their style.  I knew that the venue was a hotel, the ceremony began at 3pm, and the invitation wording was informal ;)


What to wear?

C U L O T T E S of course!

Helen from Helen's Closet recently released her Winslow Culottes.  I chose View D, the palazzo pant style.


The pattern requires 4.5 yards of 54" fabric, but I managed with 4 yards of 54" for the size 8.  I think I could have used less yardage if I weren't trying to match a border print.  I purchased the first 2 yards from Kashi at Metro Textiles several years ago and the final 2 yards from AK Fabrics.  Kashi told me that this was a lovely "Italian silk."  I did a quick burn test and the fabric burned too quickly to be silk.  Silk or synthetic, I still love it.  Especially since it travels nicely and doesn't wrinkle.


I french seamed the outer and inner pant leg seams and finished the curved crotch seams with a narrow hem before joining the crotch seams. I may have made an error when cutting out because the pant circumference didn't quite match the waistband length.  Next time I make these, I will map the paper pattern pieces against one another and cut the waistband a few inches longer. Instead of commercial interfacing, I used a heavy silk organza to interface the waistband.  I chose not to sew the pockets because I didn't want the added bulk.


To dress the culottes up for the wedding, I opted for a quick top in a stretch green charmeuse from the stash. This literally took one hour to make.  I loosely cut an "A-Frame" of the fabric for the front and a rectangle for the back.  Next, I removed the charm from an old black organza ribbon necklace and knotted the charmeuse fabric around the necklace to secure it in the front.  Then, I sewed up the side seams, trying the top on several times as I widdled it down to fit.


One of my favorite things about sewing is that it allows me to make a small $ investment in trendy clothes that I otherwise wouldn't have bought off the rack.  I am slowly figuring out the styles that I feel most comfortable and confident wearing. This one is a winner for sure!

So much so that I wore it to our last wedding of the season (phheww!) over Labor Day Weekend.  My cocktail culottes were perfect for the venue (Prospect Park, Brooklyn), time (4:30pm), and relaxed vibe of the wedding.  Hoping to finish a silk pair this week just in time for an engagement party and am already envisioning another pair for the fall in suede...

Sunday, July 31, 2016

Trending Off the Shoulder


I am enjoying a quiet week at Bald Head Island with bookend weekend visits from family.   It's hot as hades here and even the ocean breeze is no match for the Carolina heat.


There are no cars on the island and only golf carts and bikes to get around. It's just the right pace for me and there's no place I'd rather be!


My usual beach look is wild-haired and makeup free in an old knit dress.  Occasionally my Southern heritage kicks in and I feel compelled to get moderately "dolled up." I selected the Style Arc Cara for my on-trend off the shoulder look.


I cut a size 8, though I wish I had sewed the 6 as the neckline could be a smidge tighter. The blue cotton is from Gail K Fabrics in Atlanta. The white contrast shirting is a B&J scrap from my husband's shirts. The lace is from M&J Trimmings:  3.5 yards of the wider lace for the hem and neckline band and 1 yard of the smaller lace for the sleeve caps.

I originally lengthened the front and back pieces by 16 inches to make a dress.  As soon as I sewed it up I knew I had a potential wadder on my hands.  Wadder status was confirmed when my husband innocently asked if I was going for the "Robin Hood's merry men" look.  I tried belting the dress, but the Robin Hood jokes didn't cease...


To salvage the dress, I cut off 16 inches and made it into the top intended by the pattern.

The front neckline piece (which is attached to the sleeves and top front) is interfaced and elastic is only inserted on the back neckline piece to ensure no wardrobe malfunctions. Before attaching the white neckline to the blue top, I sewed the back neckline to the front neckline at the side seams and pressed open the seam allowances.  I sewed the elastic on each side to the back neckline seam allowance. See the stitching in blue below.


Next, I secured the elastic to the back neckline with a zigzag stitch on the side of the neckline touching my skin, rendering the zigzag invisible from the outside.


From there, I used a typical skirt waistband technique of stitching in the ditch to secure the neckline to the top with a clean finish. 


I enjoyed using lace as an embellishment. Quality RTW lace embellishments usually catapult a RTW garment out of my price range. This makes embellishing me-mades with lace all the more appealing. Yes, it does take extra time and care to sew down the lace, but I think it's worth it!

I sewed the sleeve lace directly on top of the sleeves.


The wider lace is sewn as an insert along the hem of the top.  I used the remaining lace to embellish the front neckline band.


For the first time since our wedding we dined at our reception venue on the island.  The quiet ambience could not have been more different from our boisterous wedding celebration over two years ago, but it was a great evening nonetheless. Perfect for my new beach chic Cara top!


Wish I could stay on "Island Time" forever!   

Tuesday, July 19, 2016

Tale of Two Laurels


It's amazing how the same pattern can look so different dependent on the fabric!  I first made the Colette Laurel in lace back in 2014 for my rehearsal dinner. Two years later, at the beginning of summer 2016, I completed a second Laurel in cotton lawn.  While the lace version will always be extra special because I wore it during our wedding weekend, the cotton version has already taken its place as my 2016 "wear it to death" summer dress. Here are the details on both makes:


Guipure Lace Version:


The guipure lace is from Gorgeous Fabrics.  It's a couture remnant that I snatched up the week after my engagement in January 2013.  I can remember Ann advertising it as normally selling for hundreds of dollars per yard. I paid $50/yard.   No doubt it's couture, as this week I saw the same fabric appear on Susan Khalje's Instagram feed for a wedding gown. The pink silk charmeuse is from B&J.

Guipure is so pretty in the candlelight!

I sewed the silk charmeuse into a full and separate dress, installing the zipper, hemming it, narrow hem at armholes and neck, finishing the seams with the serger, etc.  With the help of an instructor at the now closed Sewing Studio where I took a few lessons, I used the pattern pieces to loosely cut the guipure with very large seam allowances.  The instructor draped the guipure over the silk charmeuse dress on a dressform. We pinned the lace in place and then cut out the excess loosely around the side seams and neck/arm holes.  From there, I did the laborious work of sewing the guipure to the silk by hand.  I never made a lining for the dress, so the hand stitches are still visible on the underside. I decided to cut the lace blunt at the hem.

This is the only full length photo I have from that wonderful evening!


Although the end result was exactly what I was after, I did not use any couture techniques on my couture lace!  Tsk, tsk, tsk. If I am being honest, I am none the wiser if something is couture vs. RTW unless I look inside the garment.   I have been thinking about the couture vs. RTW debate since viewing the showcase piece at the Met's Manus x Machina exhibition: a 2015 Chanel wedding ensemble made of scuba with screen printed embroidery which Lagerfeld described as "haute couture without the couture."


Who would have thought that beautiful fabric was synthetic or that the intricate beading was accomplished with digital technology?  I think it is possible to still appreciate couture work while also questioning the time-honored view that handwork is superior to machine.

Trendsetting? Michael used his umbrella placecard as a matching fascinator!

I loved wearing this dress to our rehearsal dinner, especially with the fascinator I made to accessorize it. Sure it was a little fancy for our beach club rehearsal dinner, but you only get the "I'm the bride" excuse once!

Everyday Cotton Lawn Version:


I have been wearing this dress to death all summer!  I purchased the cotton lawn from B&J in 2010. It was my first visit to B&J and I remember that the fabric was part of a new collection of cotton lawn produced specifically for the store. At about 1/2 the price of Liberty, it felt like a good deal.

Since its inception, the lawn dress was intended to be the wearable muslin for the lace rehearsal dinner version.  I worked out the fitting kinks in the cotton lawn in early 2014, transferred the pattern changes to pattern paper, but never finished the lawn version before going full steam ahead with the lace. As any bride can attest, when the wedding is over you don't want to touch ANYTHING wedding related for months, if not years...

Summer cactus garden at Rockefeller Center
                     
The unfinished lawn dress languished in my UFO drawer until the night before a whirlwind rafting trip to Oregon this past Memorial Day weekend!  Of course.

Hotel bathroom selfie in Portland. I have been wearing the dress with this long cardigan when in A/C.

Perhaps I just wanted to wear a Colette pattern in Portland (where Colette Pattern company is based), or maybe I'm just mad in the head...Either way, finishing this dress was straightforward and only took a few late night hours. I wanted the neckline to be more of a scoop, so I folded the front in half and eyeballed it with scissors. Since the dress is unlined,  I used pre-purchased double fold bias tape to bind the neck and armholes (first time doing this) and installed an invisible zipper.  The dress is a little short on me and I wish I had 1/2 inch more length.


If I make the Laurel again, I will be sure to lower the bust darts a little, add a kick pleat in the back, and add a little length to the dress.